Sunday 21 December 2008

Long Time between Posts

Wow, December has flown by!! Not much creating happening, serious stressing about unfinished Christmas cards and gifts!!!

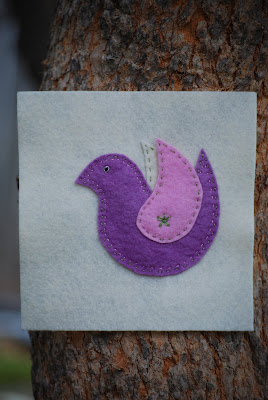
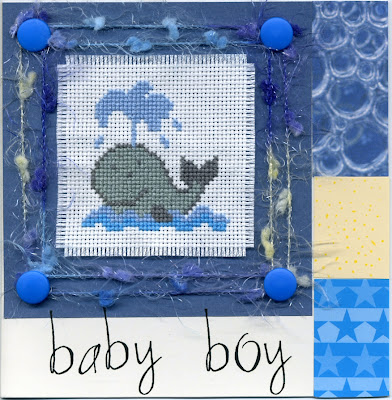
I have been experimenting with some stitching after my success with the two little stitching kits I recently purchased. Being something of a fontaholic I get regular updates from a site called Lettering Delights. They recently sent a newsletter showcasing a Doodlebat font called Christmas Birds. (A Doodlebat font contains images instead of letters and can be used like any other font.) When I saw this one some of the images were just calling out to be used in a stitching. The font cost me about two dollars. I can create all the stitchings I want as long as I am not reselling them as this would contravene the license agreement for the font.


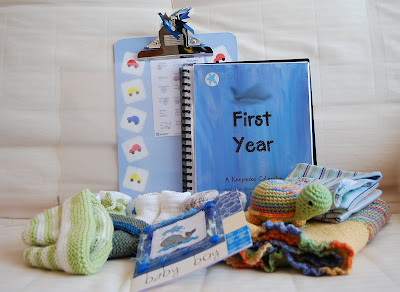
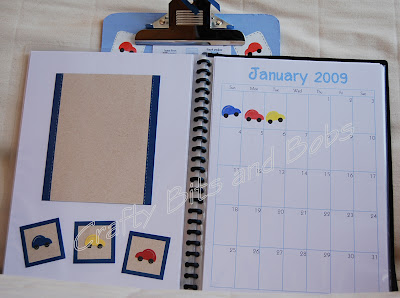
I used MS Publisher to create my templates, printed them out and then used various methods to put the image onto my fabric.

In my first try I got the size of the outline box a little bit too big for the image but was very pleased with try two. Tries three and four are here in this photo not stitched - they have been stitched but no pictures yet.


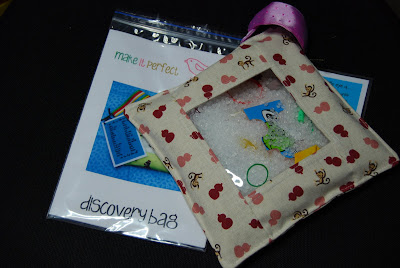
Apologies for the not so good image. Night time flash photo! What you can see at the top are the four finished stitchings and underneath are the next two ready and waiting. At the bottom are the printed doodlebats with squares around them. The one on the right had been traced over with an iron on pencil.

I am still not sure which tracing technique is the one I like best. So far I have tried fade-away pen and iron on pencil. Next on the list to try is a fine wash away pen and then after that a brown fine line pen like a pigma pen.

The iron on pencil is easy to use but the vivid red colour is hard to disguise when stitching - particularly with lighter threads. The fade away is only good if I can get all the stitching done quickly - not always guaranteed!

Hopefully after Christmas I will have time to try out some more Doodlebat ideas.

Will wish you all a Merry Christmas in this post as I am not sure how long it will be before I get back to post again. May your Christmas be all that you wish it to be!!


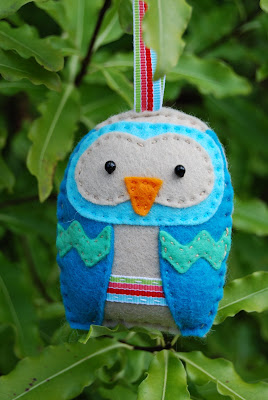
P.S. Check out these gorgeous critters at LucyKate Crafts. I really like the cat.

Thursday 11 December 2008

Tabitha


Today we farewelled a loved family pet. Eighteen years old - first child in lots of ways - and always cantankerous. She was an RSPCA kitten who turned into a beautiful cat with attitude!!!

The loudest purr, the kinkiest tail, the most awful piteous cry (able to be heard from houses away!!!!!!) and claws as sharp as daggers are all things we will remember and miss.

Unfortunately age caught up with her - going deaf, back legs becoming wobbly and a few dental issues that she seemed able to ignore but must have been hurting and an argument with our car. She came out seemingly none the worse for wear after the argument with the car but seemed to have lost all fear of big moving vehicles - quite scary really. It was time to give her a dignified exit rather than see her go through more pain.


Farewell, Tabitha twitchit with the question mark tail.


Avid Crafter and Crafty Things and the rest of the family

Friday 5 December 2008

Christmas is coming...

We're definitely heading towards the bust part of the year now! Everything's going on now that the year is beginning to wrap up.

So, a few quick updates on what's been going on.


This photo of my 'Underwater' cross-stitch is a bit out of date but it's mostly boring blue water and the small red fish at the top that I've been working on. I'm at home at the moment with a rotten head cold so more work that usual has been done on the stitching, mostly in front of the TV. It's finally gotten to big for our little scanner so it's photos only from now on!


Speaking of photos, I've been playing around with my camera a bit and this is my favourite of the photos I've taken so far. It's of pins in my pincushion and was taken with my camera's super-macro function. I think that particular function will see a lot of use in the future somehow.


And last but not least, here's a sneak peek of something I've been working on for my new cousin Emma. It's not finished yet and you'll have to wait til after the present has been received to see what the end product will be.

Now I just have to work out what on earth to give for Christmas presents this year, and there's a birthday between now and then too! My family are getting harder to sort out presents for each year.

Thursday 4 December 2008

Some Stitching is Happening

No posts lately but some stitching has been happening. I recently found two little kits that I have been slowly stitching in amongst doing all the other things that eat into crafting time.

Both the kits are from Hatched and Patched's Simple Stitchings range. The first one is called Ladybug Romp and I have finished stitching it. It is going to become part of a set of bean bags for a little niece.


The second one is called Bear In There and it is still a work in progress. I am not sure what it might end up as yet.


The little pink hoop was a new find too. It is a spring hoop that has a metal spring section that fits inside the flat pink plastic section. It is much narrower that wooden embroidery hoops and I like the feel of it lots.

The list - in my head - of things I would like to make is growing proportionately longer as the time I have to craft is growing proportionately smaller!! I have bags I want to make, fabric buckets, bean bags, bibs, a baby calendar for a new niece, more discovery bags and then there are the Christmas cards that probably should be at the top of the list.

I have made a start on some of the Christmas presents but cannot talk much about them - you never know who might drop by and read this little blog. We went digital with a few things that have previously been much more hand produced. More about that after Christmas.

Many thanks to those lovely blog visitors who have dropped by and left comments. I am thinking of creating an applique pattern for the little owl from the felt book. I am not sure quite how I will tackle it yet. The final version would be a PDF file but I am still thinking about the best way to get a good end product. I have scanned drawings before but they do not look very clear sometimes. I am wondering how others may have done this.

Wednesday 19 November 2008

Book - all done at last

I have put the pages together and bound them up so the book is all done. Here tis....


I love the felt ric rac that I have used on the front cover. I bought it from the UK and I seriously think that I need more. Pity about the exchange rate!!


A few imperfections in the layout - the penguin is on his way out of the book - but in my mind these add to the handmade appeal.


I used some of my hand dyed wool to do the blanket stitching around the edges and the binding is a little bit of gingham ribbon threaded through the blanket stitching along the spine.


The leaf page is very plain but maybe that adds to the contrast of styles in the different pages.


Friday 14 November 2008

Yippee - Last book page!!

Here it is - the last page of the little felt book that I have so slowly been putting together. I went with a leaf. To get the shape I used a scan of a real leaf and cut the shape out of some lovely felt purchased from paper and string. I just added a little stitched detail to show the veins.


I am now in the process of stitching the pages together and then I get to experiment with the binding. At the moment I am thinking of using ribbon threaded through the blanket stitching.

Thursday 30 October 2008

Crochet Bowl and Shop Update

In amongst the other things I have been doing there was time for a little crochet. Nothing difficult but quite relaxing and great for in front of the television as I fed my addiction for TV crime shows. No one else in the family understands the fixation with any of these shows so mostly they only get watched when no-one else wants the TV.

What did I make - I hear you asking - a little double layered bowl. I crocheted it amigurumi style and then just tucked one half inside the other to end up with a fairly sturdy bowl. It will be just right as a thread catcher for the odds and bods of wool that gather when sewing up knitting or crocheting.


I stitched the two layers together in the centre of the bottom and did a row of running stitches about one centimetre from the top. The most interesting bit was making the decreases at the end match the increases at the beginning because I didn't write anything down. I just used the good old trial and error method and undid and redid the decrease until it fitted.

There was also time for a quick madeit shop update with another pair of helping hands being added. Edited Nov 17 - helping hands have been sold.


Please drop by and take a look - not just at ours - but at all the other loveliness being listed on this Australian site.

Monday 27 October 2008

More Felt pages - well one more!

After a looonnnngggg time of not feeling enthused I got back into creating another page for the felt book. Remember that way back in July I shared the first few stitchings for this little creation. As I always seem to be saying - life intervened and this little project has been sitting around waiting patiently for the next pages to be sewn. At the weekend one more was finished. This one is another bird.


I experimented with a little silver around the eye and added a daisy on the wing for detail. A second row of stitching around the body also seemed to call out to be added. The single row of green just didn't seem enough.


This little bird was first inspired by this Bird of Peace that I stumbled across late last year and used as the basis for a Christmas ornament. I took the pattern pieces I have developed and cut them from felt to make this latest little bird.

One more page is all I need to do and then I will start putting the book together. Never know it might be finished before the end of the year. Possibly by Christmas......maybe.....perhaps!

Monday 20 October 2008

A little bit of craftiness...

I saw these paint sample notebooks over on a Spoonful of Sugar and just had to make my own. And then we just happened to need to go to the hardware store to get snail pellets so I picked up some paint sample cards.


They were so quick and easy to make, and stickers made decorating them so easy too. I like the plain ones too because they show off the different colours more. They have around 10 pages in them and are 8.5 x 5cm-ish in dimension, just a little size to tuck into a handbag.

The above photo was taken with my new digital camera :-)

I have a little film point-and-shoot and I've been experimenting with Crafty Things' digital lately (She doesn't use it as much now that she has her digital SLR) but I wanted a digital for my own. My brother has an earlier model of this and it's been good for him with no troubles. We saw this one in various shops getting cheaper and cheaper with the different deals and we eventually picked it up for $113. It's a Canon Powershot A470. It's auto function is pretty good and the manual settings are simple enough to change around. The one thing I dislike is that it doesn't have a viewfinder which I like to be able to use when the sun is too bright to see the LCD screen clearly. But it takes pretty good pictures which is really all I need.

Isn't it fun to experiment with a new toy!!

We have invented a good indoor picture taking studio. My dad recently got a big daylight bulb magnifier for his fiddling with electrical circuitry stuff (they all have tiny numbers that are really hard to read) and when you put your subject on the chair and position the light above it you get quite good light for taking pictures inside.

Tote Bag

Sewing is starting to fit back into the scheme of things. After the very quick whip up of the Discovery Bag the weekend before last, I found time during last week to make a very simple tote bag.


The front panel is a print from a piece of Japanese themed fabric picked up at Picture Patchwork the weekend before last. Each panel is different and I have seven more to play with. I simply added two bottom panels and then two side panels to the picture piece. I then used a piece of textured cotton for the bag and lined it with calico. I used flannelette for the inter-lining as is described in the Bend the Rules Sewing book. I like using this technique because the bag still looks quite soft. The handles are made from calico folded four times for added thickness.


The bottom of the bag has box corners. There are lots of ways to make these corners. Here are some tutorials I have come across.

Lazy Girl Designs
Craft Apple
Sew Mama Sew - Classic Tote Tutorial

One of the amazing things about today's Internet connectivity is the amazing array of ideas, how-to's and tutorials that are so freely shared.

Monday 13 October 2008

A Little Sewing Project

I managed to squeeze in a little sewing project over the weekend.

I had the opportunity to visit a little shop in Latrobe, Tassie called Picture Patchwork. Inside I found lots of lovely things to look at and some even found their way home with me. One of the things was a kit to create one of these.


The pattern is by make it perfect and is for a little thing called a discovery bag. It is a wonderful tactile hidden puzzle with lots of little objects hiding amongst the white pellets waiting to be discovered through the plastic window.

The shop had the whole thing packaged up for you so that all you needed to do was cut the fabric to size and sew it all together - too easy!! I started the cutting late on Sunday, started sewing very late on Sunday and finished it off today. There has been very little time for sewing -- - I have a stint of full-time work occupying most of my time at present --- and this was just the thing to keep the sewing withdrawal symptoms at bay.

Here is another photo showing the little laminated card that came with the kit. It lists all the things to find.


Sunday 12 October 2008

Useful Bag


I made this bag before we went to WA and used it every day while we were travelling. It fitted the essentials just nicely and stayed slung over my shoulder messenger style even when I was in the car making it so easy to hop in and out. The pattern is a Melly and Me design called Sunshine.

Changes made were:

* added lots more length to the strap - too much it, as it happened, so I shortened it by adding a button on the strap to hold the not need length together. See second photo.

* I did not want the ties for a closure so I added a stretchy hairband that reached to the first button on the bag. This made the closure off centre but in the end I decided that I liked that. The hairband needed to be knotted to make it hold securely to the button. This first button was then stitched on with twice the number of stitches to make sure it did not fall of with constant use.

* I lined it with calico and added a layer of flannelette (as described in Bend The Rules Sewing) to the calico before sewing it all together to give the bag a little more structure without being too stiff.


Some of the fabric used had been in the stash for a very long time. It was a textured open weave in pale greens and natural tones. I combined it with a texture cotton in an off-white colour and some small pieces of patterned quilting fabrics. The buttons have been lingering in the button jar for a while as well.

Two different sized zipper pouches kept all the items inside neat and tidy. When I was in the plane I squeezed in an extra zipper pouch containing MP3 player and earphones.


Last photo is just to show the bag in use.


Saturday 11 October 2008

Busy Bees

Yet again not a lot crafty is happening around here. This past week I have been playing in an Eisteddfod with my various school bands. My school did fantastically this year, getting five 1st places, two 2nd places and two Merit Certificates. I play in a stage band, concert band, flute quartet and sax quartet so I was pretty busy! It's all over now except for an awards ceremony tomorrow that I'm attending as representative from my school with another girl because we've been awarded one of the big awards! Hopefully things calm down a bit now and I can get back to crafting.

However, in slightly crafty news we recently bought a small daylight lamp for my cross-stitching which I tend to do in the evenings, when there isn't a whole lot of natural light around in our house. It's only a small lamp that is designed to clip onto the frame of a piece of stitching. I've found that my music stand makes a really good stand for it because it gives you a lot more flexibility in pointing the light different directions. It's amazing how bright the tiny bulb is, and the difference it makes to the lighting on my stitching!

Saturday 27 September 2008

We Are Back

What a long time since our last post. We are back from a little holiday to W.A. (Have been back for a week but what a busy week it has been - no time for posting and even less time for catching up with my overflowing Google reader). We spent time in Perth, Fremantle, Albany, Esperance and Kalgoorlie. The weather was not the best but we saw all manner of beautiful and interesting things - scenery, wildflowers, mining history, wild windy water, a whale, tingle trees, tall trees and lots of straight roads!


This is just a sampling of the many photos that were taken.

Will post some crafting stuff soon.

Saturday 6 September 2008

Finished At Last

One baby present all finished, wrapped and ready to post. I love being able to greet a new member of the extended family with lots of little handmade goodies - some practical, some just frivolous and some intended to continue a family tradition.

Name smudged deliberately.

The keepsake calendar was the one thing holding up the posting of this particular parcel as I tried hard to get all the pages ready in amongst a whole heap of work. I use Scrapbook Designer Plus (link just to show the software picture) to create the basic calendar pages and then printed these onto heavier weight card before decorating. This time I chose to make little car stencils using a car punch and some leftover laminating scraps. I added the wheels with my black Dottarific pen and a little bit of silver gel pen highlight.


The calendar starts with the month that my nephew was born in and continues through to end with that same month one year later. I decorated a wooden clipboard as a holder for the current month and opposite each month, in the book, is different decorated page for photographs. I also include a set of stickers I have created using MS Publisher to mark milestones along the way.

This is the third one that I have made this way. My initial design came from looking back at my own children's calendars - one purchased and one handmade.

Other parts of the gift have already been blogged about. There are booties, little hats - knitted by Avid Crafter, little onesies - found on special at a local shop, pram blanket and crocheted tortoise.

I received many little pairs of bootees when my children were born - all lovingly hand knitted by a very creative Aunt. She has since passed away and I think it is nice to continue the bootee tradition - even if the bootees hardly get used.

Our little trip is getting closer - this might be the last post before we head of to explore parts of Western Australia. We will see how things go.

Monday 1 September 2008

Baby Card


This is the results of around 4 hours work, and that doesn't include the time taken to do the cross-stitch - that was already done! Everything is taking a long time at the moment, I have a head cold and thinking is very hard work! I'm actually quite lucky that I haven't been sick before now as there's been lots of illness flying around the schools all winter. So excuse any waffle or mistakes, my brain isn't working.

We had the presents all ready for this new baby cousin, born late August and really needed a card. So all the supplies got pulled out and looked through it all to try and figure something out. I have a folder full of completed cross-stitches that haven't been made into anything yet and this little whale was in there and seemed suitable for a baby boy card. Then I found some scraps of blue card that fit in colour wise. And then I found the Tie-Downs that I picked up free somewhere along the line in the 'Jewel' colours. Everything sort of started to fit then. The letters are a Making Memories rub-on alphabet called 'Heidi', that I really love. The blue fluffy fibre is just cheap Chickenfeed yarn, and the cross-stitch itself was an Anchor kit I stitched up quite a while ago and it's just sat around ever since!

Now we just need to write in the card and the whole package can be sent off to bub and family.

Thursday 21 August 2008

How Charming...

I couldn't resist that title!


I recently finished off a charm bracelet kit that I bought years and years ago through the school bookclub. The kit had the bracelet, beads, wire, clips and instructions to make 5 different under-the-sea themed charms.

I love the finished result, but they were soo fiddly to make!! The instructions required that at some points, 4 lengths of wire would pass through one bead each time and there was no way that was going to happen! So they worked with a little bit of instruction-tweaking, a fair dose of patience (well, sometimes), pliers and help from Crafty Things. If I was going to remake the charms I would use finer wire to make life much easier.


I started off with the turtle, and didn't really have many problems until I came to attach the lobster clip used to clip them on the bracelet. It was one of those 4-length circumstances. Hmm well, quite a bit of frustration later and it was attached safely. Next was the fish. No trouble with the charm but I'd learnt about the clip attaching now. The instructions said to attach it to the centre bead of the big fin but it already had two wire lengths through it so the fish's mouth it was. Next was the crab and I made the charm and then left it for a while (i.e. years) until I attached the clip. Instead of putting the wire through the one bead I used a few of the nearby ones to secure the clip and that worked ok. The octopus and seahorse were made in quick succession. I had a little trouble with the octopus' legs - the wire tail would go into the bead ok but not out the other side because I'd pulled the row a little too tight. The beads had no room to move and there was no way to change it. So don't look to close at his legs because it's extremely untidy. I had similar trouble with the seahorse. You make a right angle turn at the end of his head involving sliding the wire through the entirety of a previous row. The row happened to be bent and the wire refused to got through properly until we could get the row to straighten up a bit.

When I first got the kit the bracelet was quite a bit too big for me, since I've always had small wrists, but now it fits pretty well. As you can see in the top photo, the charms are pretty big (approx 3.5cm long) which makes doing some things (for example typing) difficult. But I'm happy with it.

Who knows, I might just collect myself other, smaller, charms and make it into a really intricate, full charm bracelet that isn't quite so themed.

Friday 15 August 2008

Still Sewing

Well I am still sewing along but it will slow over the next few weeks as other parts of life take priority. This time I have had some fun making lined drawstring bags as per the instructions on this blog. These are a great size for stashing small items in for packing and I have also found them useful for taking coins to the bank. My DD is busy selling chocolates to raise funds for her school band trip later in the year so many coins find their way home.


I am going to vary the size of the bags when I make the next ones. Maybe some big enough to put shoes in. They will be very useful on our trip that is getting nearer now. The fabric is a varied selection from the stash - some is over ten years old and some purchased recently.

Next little sewing task came from the purchase of this great little felt kit from paper-and-string.


A terrific little felt kit to make a little owl ornament from felt. Look at how wonderfully it was packaged and I was also lucky enough to order at a time when some free felt squares were being added to every order. Lucky me!! I wanted to start as soon as the parcel arrived last week but I was very good and finished off the drawstring bags, did the housework, went to work, taxied children and all that other stuff that intervenes with perfectly good creating time - not to mention watching lots of Olympic events on television. Anyway I have found a little time for the creative stuff of life and here is the little critter all finished up.


I enjoyed stitching it and will be creating a few extra a one is never enough for owls - you have to have a parliament or they get lonely! I got everything needed to make one owl aside from thread and needle. There was a pattern, instructions, felt, felt ric-rac, beads and ribbon. I used press and seal to cut out the pattern pieces - have found this very useful with felt. It is see through so that you can lay it over your pattern and trace of pieces and then lay it over the felt to cut out the pieces. Probably not very environmentally friendly being plastic but I get very accurate pattern pieces this way.

The weather has been very wintry this week so finding good light for photos has been difficult. There was a little bit of sunshine earlier so the little owl found its way outside for a quick pose in the trees. The pouches were just photographed inside as there were no dry spots to put them down outside. Another wintry shower is moving through as I type - wetting the clothes that I foolishly hung outside on the clothesline in a vain attempt to get them dry. Oh well they will just have to have a second spin through the washing machine later and then get hung on the clothes-airer - just have to wait for what is already on it to dry first!

Crafting is so much more fun than housework.