Sunday 29 July 2007

Lots of Pics

Here are the promised pictures plus the next project I created.


This is the butterflies picture. I got it as a kit from a dollar-store type place for $2 and this showed in the quality of the aida, which was rectangular rather than square. However the finished picture doesn't look wrong because of it. There is a slight visible kink in the border though.


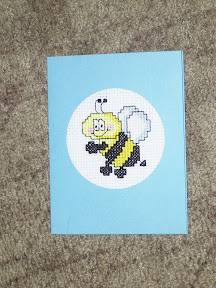
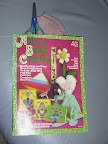
This is the buzzy bee card, all put together and ready to share.


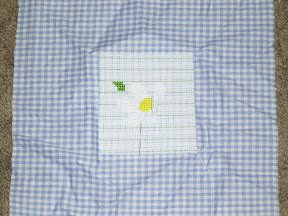
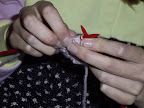
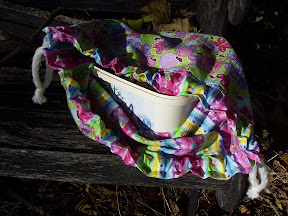
And this is the next project, the daisy, with wrinkles and all in the gingham. The finished daisy will probably be a patch on a bag or similar.


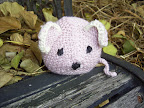
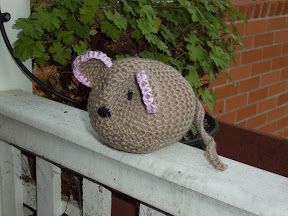
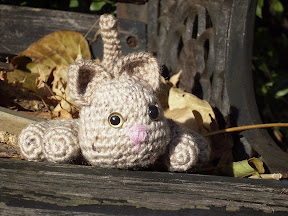
Here is the mouse I've knitted while being home sick. It is done in 3 sections and has crochet edging on the ears and the tail is crochet too. He's a fairly simple design and I think I'll give him away, although I don't know who yet.

Tuesday 24 July 2007

Winter Ills and not much crafting

Well the winter ills have hit the family and DD is sniffly and altogether feeling yuk! Both she and I are knitting some little mice from a book I have had for years.


These little mice turn out not so little and oh so fat. They have a crochet edge around their ears and crochet tails as well. This little mouse will be quite happy going off as a present for a nephew about to turn one.


I have started knitting the bag on my to do list and I made a new bag for all my cross stitch threads to travel in. The other one was disintegrating a little more every time it got packed in the car. I used some more of the fabric from the tablecloth I purchased from the secondhand store.

Web browsing has been fun.

Check out this wonderful blog I stumbled across. Aren't the flatties cute.

ArtRage has been upgraded to version 2.5. I have just downloaded it and played a little. There are stencils, more layer options alongside all the wonderful stuff it already had. Imagine art materials galore without the mess! No running out of paint or paper.

Thursday 19 July 2007

I'd like to be ...

From Sewing Stuff

At last I have finished sewing my felt octopus stuffie from Futuregirl's pattern. I came across this little fellow on her blog and just loved him. Alice was very helpful and answered questions for me along the way. It took a little bit of time to get him finished but he is now happily guarding the dvd collection on my mantlepiece.

I wish that my stitching was a little more even but I think that I just need a bit more practice. I bought some wool felt to make him and found it very easy to work with although cutting the curves on the legs was a bit tricky. I found some blue and green buttons while out shopping and decided to add these to the eyes rather that have sequins like on the legs.

I also think that the variegated felt makes my little occie look like he is in the process of changing colours. If you have ever had the opportunity to watch one of these amazing creatures in a rock pool they change colour as they move over and through the rocks.

The title of today's post came about because the song just wouldn't get out of my head when I was stitching. Then it was just the opportunity to dream about where else I would like to be!

I'd like to be... anywhere warm at this present time. I usually enjoy winter but this year am already wishing for it to be over. I am usually pretty immune to the winter blues but just lately have felt very down and miserable. One saving grace has been being able to read and comment on the very wonderful crafting blogs out there. My RSS reader is now looking at 129 very interesting blogs with things to share, information to pass on and pictures to show. Some are knitting blogs, other sewing, other crochet, other about education, other about papercrafts and then others about computers.

Monday 16 July 2007

Busy cross-stitcher

While Crafty Things has been taking a break from crafting, I've been busy cross-stitching. I have finally completed the butterflies, yay! Two more projects have followed. The first, a buzzy bee card, has all the stitching done and I just have to turn it into the card. The second is a daisy that is being done on gingham fabric with waste canvas. For those of you who don't know, waste canvas is a type of fabric that gets tacked onto other fabric and is a guide to help you place your stitches. Once you have completed the stitching the waste canvas gets pulled out thread by thread and you are left with your stitched design on a fabric you couldn't normally use for cross-stitch. Waste canvas is ideal for putting stitchings onto clothes, baby bibs etc. The daisy currently has 3 and a half petals out of 6. Hopefully it will be done soon. I don't know what it will be put on yet but it's looking like being a bag of some sort.
Pictures will come soon, promise!

Friday 13 July 2007

A Lull In Crafting

There has not been a great deal of crafting happening of late. The more mundane tasks of life have been more in the foreground this week - cleaning, washing, cooking, washing, cleaning, teenage taxi service, gardening etc. I have a few cards that need creating so hopefully there will be some time this weekend.

Luckily for me there are all those creative blogs out there with ideas and inspiration to keep me sane. I loved Rose Red's , light hearted, two part tutorial on zip lock bags - ever increasing stashes must be stored somehow. You can't have too much wool or fabric.

I have fitted in a little knitting at night but that is all. The knitting was only little and practical, using up some cotton to create some small bags to put the leftover pieces of soap in.

On the to do list is finish an octopus from this pattern, start knitting a bag to be put away for a Christmas present, sew a few notebook covers from this pattern and crochet some more amigurumi.

Friday 6 July 2007

Another Amigurumi and some Papercraft


Yes I have definitely become a collector of these patterns. I needed a ladybird for a gratitude gift I was putting together and so off I wandered to the land of Etsy and found just what I wanted at Lis Tan-Chaong's shop - Simple Arts Planet. The pattern is called ClawlieBuggie, The Lucky Ladybird. I ordered the pattern and it was in my e-mail inbox before I could blink. How's that for service. Later that night there was one completed ladybird and one half done. Both have since been added to the Gratitude Gift and are on their way, with the rest of the parcel, to the lucky recipient (who shall remain nameless at this stage) .

From Crocheted Flo...


My other crafting endeavour, also for the parcel, was a handmade book.


From Assorted Pape...


This little book is the continuation of an idea that started two years ago. As parent help at my daughter's school I was asked to be involved with some crafting sessions. I came up with the book idea as an introduction to mono line calligraphy. Over about 8 weeks the group practiced their calligraphy and produced all the parts to make a birthday book. Each page was a pocket page and an index card slipped inside to record birth dates for each month. Having them on index cards meant that they could remove a card and put on the fridge. Their books looked like this:

I didn't want plastic comb binding on the one I have just made and so the whole idea was to explore a different method of binding. I added a hinge to the pocket pages and then used thread to join all these together. By doing this the pages turned very freely. I was quite pleased with the end result but am still trying to think of some other ways to bind my book. Here is one last picture showing the inside of the book.

From Assorted Pape...

I had fun with the Gocco stamp I talked about in another post and hand lettered the months and then stuck these on over some gold paint. My daughter's DYMO label maker came in handy for the smaller month names on the index cards. I used clear plastic tape in the machine.

Wednesday 4 July 2007

Gocco

I have owned my Print Gocco machine for about 5 years and use it sporadically. I have used it mostly to make Christmas cards and wrapping paper. I have a gadget called a Hand Stamper which is great for printing repeat patterns on large paper to make your own wrapping paper and matching cards. On the Aussie site Nehoc they have this listed as discontinued. How sad as I found it to be a very useful addition to my Gocco kit. At some stage during my purchasing of supplies I was sent a little kit (all instructions in Japanese) that showed how to make four small hand held stamps from one screen. I had just filed it away for future reference and found it the other day.
From Assorted Pape...
It is the tiny little white cardboard thing in front of the ink box. Boy did I have some fun with it. I created a little flower motif and stamped to my hearts content. It is a little fragile and the screen eventually cracked at the side where it was folded but that was after I had unfolded it a couple of times to add more ink. I rescued the various cardboard bits to reuse with another small image. All I need to track down is some thin soft foam as this is what was used to press the ink through the screen. Here is a card made with the paper I created.
From Cards 2007
My daughter suggested that next time I use grey rather than black for the smaller flowers, particularly if I was going to use it as background paper. I might try that another time after I have used up all the pieces I printed this time.
From Assorted Pape...
I drew the flower myself. I used Paintshop Pro and had a pentagon on the bottom layer. This helped me to keep my petals in an even spacing. I used my tablet pen and hand drew each petal on a second layer. I copied this layer and pasted it as a third layer and rotated it slightly so that my petals had a second shadow line. I then hid the layer with the pentagon and because I did it on the computer it was very easy to re-size. I then traced my printed image with the fine carbon pen to get the image that I could use with the Gocco machine. I used it in another little project that can't be shared yet. In this dreary winter weather it if nice to have lots of crafting fun.

Amigurumi again

I just can't stop at one. I have had a ball cruising Etsy looking for PDF crochet patterns and am in awe of the very creative people out there. I think one of the things I like most about these little crochet creatures is how quickly you can make them. For me they are a great night-time crafting activity. I can sit and watch a bit of tv and create at the same time. The latest creature to join the menagerie is a little cat with a curious tail. This pattern is from Kristie's Etsy shop - Kristie's Kreations. There are designs in the pattern for a cat, bunny, bear and mouse.

From Crocheted Flo...


Doesn't he look great just lapping up the late winter sun in the garden.

Tuesday 3 July 2007

Bags, Bags, Bags

From Sewing Stuff

I have been making a few bags just lately. The first two are my own design made to fit around a rectangular plastic ice-cream container. The first one is lined with a contrasting striped fabric and this also make the casing. I find them very useful for travelling in the car and I have made several for my daughter and her friend to use as knitting bags and holders of all things crafty. The bag and lining are just large rectangles with seams at the sides. The next step is to create the sides of the bag by sewing across the bottom at the corners. The ice-cream container is then nicely hidden inside where it holds everything together and give the bag a very rectangular shape. Not a trendy bag but a useful storage bag that recycles the growing collection of ice-cream containers. The bag is just the right size for my French Knitting tool to live in.

The second one is not lined and the drawstring casing is a piece of wide ribbon attached to the outside of the fabric. I loved the spotty fabric. This one was made to hold the ice-cream container I have used for many years to carry the assorted medicines and stuff needed for kids when we are travelling by car. Much nicer than tying it into a plastic shopping bag! The cord for both was made with my very handy Clover French Knitter.

From Sewing Stuff

The last bag was my attempt to create a grocery bag like the green bags sold by supermarkets. The fabric is a secondhand table cloth. This was made in a similar way to the other bags. I added some heavy weight iron on interfacing to the top of the lining to make it firmer. Once I had put the outer bag and lining together I added handles. The depth of the sides was much greater than my small drawstring bags so I folded the the sides at the front and back and stitched alongside the fold. This gave the sides more definition. I also made an insert for the bottom which had some stabilizer sewn into it. Not sure if what I have just written makes any sense. I was fairly pleased with the end result, mismatched squares and all.

From Sewing Stuff

So each bag basically started out as two big rectangles, seamed at the sides and given side panels by stitching across the bottom corners. Here is a link to a tutorial on creating a simple tote with a good photo of how the bottom corners are done.