I have wanted to play around with making a pencil roll for a while. I needed a little thank you gift for a few children I know and thought that this would be the ideal thing. I really liked the one made by Pink Chalk Studio. If I had more time I might have tried coloured sections but I needed these in a bit of a hurry. I also loved the ones made for kidding around's - Made For China appeal.
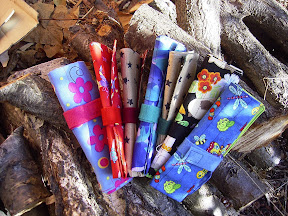
I wanted to avoid a ribbon tie so I have tried felt with velcro for the closure and I added a fold down flap because I didn't want the pens and stuff to slide out the top when the children were carrying them around. The first one I made can hold twenty four pencils but was just a little big for the intended recipients. I cut the next narrower and when they were finished they could hold twelve coloured pencils plus a grey lead, blue pen and red pen. I am hoping that the children will let me know if they were useful and if the felt and velcro worked to hold them closed when they are rolled up.
I loved being able to choose bright prints for the rolls and if there wasn't quite enough for the size I wanted it was easy to add in a little contrast. I also needed them all to be different so that the owners would easily be able to identify them.
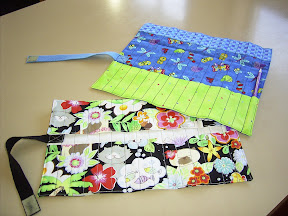
The fabric for the body of the roll is 33.5 cm wide and 28 cm high and most of the time I cut this piece on the fold across the widest measurement. The pocket piece is 33.5 cm wide and 12 cm high with a 2cm fold down hem at the top. The finished pocket is about 10cm high which seems to be a good height - especially for well used and much sharpened pencils. I made each of the pocket channels about 2 cm wide and sewed from top to bottom for each one which gives the whole roll a quilted look. A walking foot on my machine made sewing the channels very easy as nothing moved.
Putting them together became quicker with each one. First step was to overlock and press down the hem on the pocket. Next I lay this right side up on the other piece of fabric. I then folded the larger piece over the top so that the right sides were together and this sandwiched the pocket inside. I sewed around the three sides, leaving a small gap on one of the short sides to turn it through. Once it was turned through I pressed it and topstitched all the way around. I marked the channel lines and them sewed these, using the walking foot. To sew them I started the first one and then sewed along the topstitching to the next line and so on to the end. This meant fewer ends to cut off. The felt was attached last and it had a hook piece of velcro attached to one end.
No comments:
Post a Comment
Thanks for visiting our crafty blog. Your comments are appreciated.