Friday 30 November 2007

Secret Crafting

Oh, this time of the year gets hard! I have just finished something that I would love to share but the someone that it is intended for reads this blog. I will just have to be patient and wait 'til after Christmas.

A sneak of colour wouldn't hurt.


Will leave you with a few new places I have found to visit.

Need a drawstring bag tutorial then check out this blog. Just click on the category of drawstring to explore a lot of different options.

I have made a couple of zippered pouches using Amy Karol's book and was just a little bothered about the hand stitched lining so went web cruising and found a great tutorial for a cosmetics bag. I am going to try her zipper technique soon.

Another zipper tutorial for making a zipper wristlet. I love the clear photos.

Wednesday 28 November 2007

Zipper Pouches


This is the second project from Amy Karol's book - Bend the Rules Sewing. My daughter needed a zippered pouch for a new bag she has and it seemed like the ideal thing to try. There were some errors in the instructions. A quick visit to the Bend The Rules Flickr group soon sorted that out and the second pouch progressed much more smoothly. My questions had already been asked by someone else and the answers were all there. This is one of the things that I find so amazing about the Internet - the connections that are created by it. Amy's answer was there for all to find and she is so encouraging.

Have you seen all the softies in the window at Meet Me At Mikes? They are just hanging around until they are delivered to the Mirabel Foundation.

Sunday 25 November 2007

More Button Necklaces

From Avid Crafter'...

Here are the next lot of button necklaces. I did make them a while ago, but just haven't got around to posting them yet. These four are going to be gifts. I experimented with putted beads on eye pins in various positions, but my favourites are the blue and green necklaces. The green and yellow ones don't have any beads in them, just buttons.

This necklace is for me though:

From Avid Crafter'...
This one has a button with 3 holes at the top which makes it split into two. It took quite a bit of rearranging before I was happy with it, the addition of the tiny pearl beads just seemed to add more to it. The only downside of it is that the clasp is particularly stiff making the neclace hard to put on.

Friday 16 November 2007

Have you seen?

No crafting to show but have you seen:

Moonstitches flat owls for banners. I made one of the owls that she has the tutowlrial for and I am itching to try this next idea.

This potholder by Creative Little Daisy. I love the colours and the whimsical look that this owl has!

This cool Christmas decoration idea. Do you remember making yarn dolls? I couldn't help myself so one was made yesterday but no photo yet.

I have sent my little monster off in the post to meet all the other softies that are assembling at Meet Me At Mikes for the Mirabel Foundation. I hope he travelled safely and is catching up with all the gossip.

Avid Crafter is very busy making many more button necklaces. Hopefully she will post some pictures when they are all finished. We are looking forward to a girls' weekend as the boys have gone spectatoring at the V8 Supercars!!

Monday 12 November 2007

One Little Monster


One little monster waiting to be posted. This is my softie that I made for the Softies for Mirabel campaign run by Meet Me At Mikes. It is based on a pattern in the book Usborne Art Ideas How to Knit. This book was given to my daughter just recently and has some very simple patterns in it. I made the monster with 100% wool and felted him before adding the stuffing. Instead of knitting the arms and legs I used my Clover french knitting tool and felted the braid before cutting it into the pieces for the arms and legs. I added a little bit of blanket stitch to the ends of the arms and legs just to make sure that they didn't unravel.

Friday 9 November 2007

Latest Sewing Attempt

From Sewing Stuff

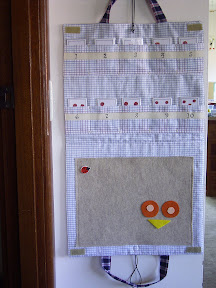
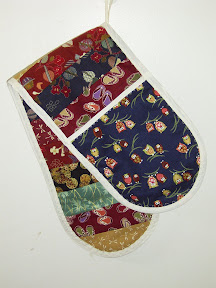
Here is my latest sewing attempt. It is a playmat/bag that opens out and could be hung from a hook. There are tabs of velcro in the top corners to hold it shut. I got the idea from a dinosaur mat/bag that my son was given when he was small. The picture above shows it hanging from a hook with the little card pockets and felt board showing.


It all started with this applique which was completed a couple of months ago and was just waiting around for an idea. The applique was a purchase at the Craft Fair at the start of the year. It is from The Craft Cubby.


Very slowly the idea of making a carry bag/play mat was born. I wanted little numbered pockets to hold some cards that I had also made. These can be used for memory games, snap, sorting or number matching games. Then I wasn't sure what to put on the other part of the mat/bag so I had to sleep on it some more before coming up with a felt board.


It is still evolving as I am creating felt pieces for the board section. I think I might make a couple of little holders for the felt pieces as these could be stored in the front pocket.

What have I learnt!

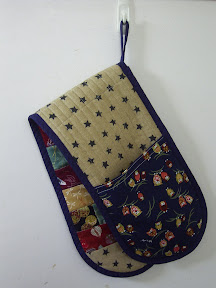
1: How to quickly quilt the outside fabric using the method outlined in the beautiful book "Last Minute Patchwork and Quilted Gifts" that recently arrived in my household. This method is used for the very quick baby quilt and I found that it was just what I needed to hold the batting in place on the outside fabric. It is hard to see in the photo showing the front and the pocket but there are little red satin stitched ovals in some of the blue squares.

2: When a project evolves as you go along sometimes things don't go to plan. The handles are too far apart and so the mat buckles when you carry it around. This meant the addition of a piece of cord in the centre so that if it is hung open from a hook then it will not buckle. See the photos below! I also think having had a second (third, fourth..) look at the dinosaur one that the handles are too deep for a little one as it will drag on the ground if they are carrying it. I have no little ones to try it out with!


3: The pocket also gaped when the bag was carried and so another loop of cord was attached - this came over from the back and down to the pocket and over a big button. This was decided on very late in proceeding and so I had to hand sew the buttonhole. Only took two tries to get it looking nice! Oh well at least it looks even with two pieces of cord hanging around as well as the handles.

4: Deciding on the outside seam allowance first rather than after the creation of the inside pockets is a better idea. The edge pockets are narrower that the others. Measuring and dividing is a better approach that eyeballing and guessing. Lucky for me I chose squared fabric because I used count the squares as the way to decide where to stitch the pocket lines.

5: Stiffening the felt board with an iron on stiff interfacing (it looks a bit like holey white card but is slightly more flexible - sorry cannot think of it's name and I do not even know it I was told the name when I bought it) is a good idea except for when you are trying to turn the whole thing through a small opening after sewing the outer and inner fabrics together.

6: Making the cards is easy with pre-purchased business card paper that runs through the printer and is then torn apart on the perforated lines. There is even a template in Word so that everything aligns properly. By the way I created the ladybird image on the cards a couple of years ago when I was learning how to create vector images in Paintshop Pro. You can buy laminating film that is just the right size for the cards and has nicely rounded corners. I just used my little home hot laminator and had no trouble.

7: If I tried to sell it I would lose money on the deal. Isn't that the way with lots of handcrafted stuff - we put so much love, effort and heartache into our creations. Lucky that it is a Christmas gift.

8: The button worries me as the intended recipient is probably too young for things with buttons. I did stitch it on as securely as I could with waxed dental floss and chose the biggest one I could find at short notice in my collection.

My idea was that even though the recipient is a little on the young side for learning numbers etc that they would have fun just putting things in pockets now and be able to play card games with Mum or Dad or someone at a later age. What do you think?

Wednesday 7 November 2007

Second Try and Much Happier


Here is my second try at replacing the sad, old double oven mitt I owned with a newer, nicer model. I think it is better than the first try but it still needs to be put through its paces in the kitchen before a final verdict is reached!

I used a layer of cotton batting (at least I think it is cotton as I have just found what I think is the labelling that came with the batting when I bought it eight years ago) which I quilted to the bottom layer of the mitt. I attached the Insul~Bright to the top layer and quilted that as well. I put the two layers together and added the pockets which are doubled for a bit more protection. Once it was all stacked up I stitched around the edge with a multi-step zigzag stitch before adding the binding. I even tacked (a very rare occurrence) the binding before I stitched it on. I was much happier with the binding on this one as it didn't wrinkle much at all.

To make the pattern I just measured the old one and drew a rectangle. I found a nice curve (that matched the curve on the old one) to trace for the ends and then measured the pocket depth and created a pocket pattern piece.

If the test run in the kitchen is successful I will make a few for presents. While I sit typing this my mind is wandering back to pleasant memories of my children using the old one as alligator jaws and chasing one and other up the hallway going "SNAP, SNAP, SNAP!". I think they were about 3 and 4 at the time. Got to love vivid imaginations!!

Monday 5 November 2007

Log Cabin Patch

From Avid Crafter'...

Here is my first attempt at a log cabin patch. It's the most adventurous patchwork I've done as I've previously only made 4 square patches. It has turned out quite neat considering it's my first. I had a LOT of help from Crafty Things on this, otherwise the strips would probably have been much wonkier!

All the fabrics have come from the stash. I originally planned for pinks but that sort of didn't happen as there wasn't much in the way of dark pink. If I did it again I probably wouldn't use the pink on the 'darks side' or the very bright fabrics.

It's very eclectic, but it's mine and I'm proud of it!

Replacing an Oven Mitt


Here is my first try at making an oven mitt to replace my much loved and very worn oven mitt. I have had it for longer than I should! The old one was just the right size and had just the right insulating properties (couldn't think of a better word!) and so I just kept on using it long past the time it should have been retired. One Mother's Day my children even gave me a new one but it was too thin and so just resides in the cupboard and never sees the light of day.

I had some batting that I had purchased ages ago intending to make a replacement but just never got around to it. I think that the batting is Insul~Bright or at least something similar but I didn't keep any product information from when I bought it. I didn't do any web research either which was a bit silly as then I would have read the suggestion about also using a second layer of cotton or wool batting. This mitt is OK but still not as good as the old worn favourite!

The fabrics were from Frangipani Fabrics. A roll of Japanese cotton prints that caught my eye and had been waiting for a suitable project to be used. I still have lots left for more projects. A second mitt is in productions using more of the same fabrics but this time I have added a wool (make that cotton) batting layer as well as the Insul~Bright layer. I have also quilted the layers more with the second mitt. It is still waiting to have the binding added to the edge. I also added a second layer to the pocket section because I felt that the pockets of the first attempt were too thin.

I was not at all happy with the stitching on the binding of the mitt in the photo and ended up going around twice. The binding moved and stretched and wrinkled dreadfully! Any tips on how to do a better job would be greatly appreciated.

On another tack altogether. If you have small ones and need some ideas for some creating fun check out this site! It is called "kid's craft weekly" and boy did I wish that it had been around when my biggies were littlies! So many great ideas and an online newsletter subscription option plus a book offer. Oh to have some littlies to play with again! Oops - such a lot of exclamation marks in this little post.