Sunday 30 March 2008

Some more Cuties

Here's the latest bunch of cute critters my friend and I have made from The Cute Book.


We have in the back from left to right: Sprite, Mr Frog, Lizard and Kidnapper. In front is Mr Tad (with the legs), Mr Pole and White Rabbit.
All of these took less than a day to make with spare time spent exploring an op shop, no finds today though. :-(


These ones are mine, currently decorating my shelf.


And these belong to my friend.


Also just made is Arno Cat from the Softies book Crafty Things bought a while ago. He's orange and yellow and will be a gift for a young cousin of mine if I can bear to give him up. Unfortunately there are no pictures yet.

Wednesday 26 March 2008

Happy Easter

Belated Easter greetings to you all. The blog silence was because we went away for Easter. Easter this year was also Avid Crafter's birthday - a double set of celebrations. She is definitely not lacking in chocolate supplies!

A little crafting happened on the Easter break but no photos yet. I had time to experiment with dyeing some of the little crocheted flowers that I make. I found some very cheap 100% wool in Spotlight and crocheted the flowers first and then dyed them. I tried out some lace dyes that I bought last year and some ink. The ink was an experiment following some information I picked up at last year's craft fair. A little ink in some water, put in the wet flower and zap in the microwave for a short time to heat set the ink. I have yet to rewash the flower to see if the dye has set. I will post pictures soon but have not yet had time to take any and today is revolting weather with no good light for any picture taking!!

Instead I will post this shot - taken in my back yard recently. Ballet dancer is what I thought off when I saw it.

Wednesday 19 March 2008

Still More Holiday Crafting

Oh dear it is almost Easter and I am still posting photos of the Jan/Feb holiday crafting. How silly is that?

Here is my first attempt from The Cute Book. Avid Crafter has much more experience with these little critters and they are definitely fun, addictive and cute. I now have this little bunny dangling from my handbag. Here she is posing amongst the tea-tree flowers.


Aside from finding stray photos of holiday crafting there has been some sewing happening. We both need an apron for a cooking class we have enrolled in - A mother/daughter cupcakes evening - and so far the only one completed is Avid Crafter's fruity goodness.


The pattern is Kwik Sew 2311 - View B with a few minor modifications. The fabric was a bit on the light weight side so we made it lined and that avoided all the bias binding that the pattern had round the edges. We used some pretty ribbon for the neck loop and the tie. The last little detail - not yet done - is to add two little polka dot heart buttons at the top where the neck loop is stitched on. The fabric has strawberries and cherries scattered all over a pretty checked background. What do you think?

Next up on the sewing ranks was this top for Avid Crafter. The fabric had been chosen some months ago but the style of the top was not decided upon until just lately.


The pattern is Kwik Sew 2694 - View B and is very quick and easy to put together with the help of the ever trusty overlocker. This is the second time I have used this pattern and have been pleased with the results both times. Avid Crafter happens to be wearing the other one in the headless apron shot. The pattern sits very nicely and the only modification was to stitch the crossover down to avoid gaping and embellish this stitching with a little heart button. Apologies for the backgound in the above photo but the clotheline was the ideal hanging spot - nice and sunny but the overgrown garden bed doesn't look crash hot - no gardener am I!


Note to myself - do not stitch down crossover before said recipient tries on top as then there will be less unpicking and restitching to make the top sit just so! All that aside the top meet with approval as it was worn straight away. What a great feeling when this happens.

Last note on this post - Winners of the birthday giveaway - the parcels were posted today.

Tuesday 18 March 2008

Blog Birthday Winners

Yes we did put winners in the title deliberately. Thanks so very much to all the people who left comments. As there were more comments than we expected to get we made a snap decision to draw out two names.

Congratulations to

Lisa Boyer was the first name to be drawn from the container and CurlyPops was the second. Zipper pouches and choccies will soon be heading your way.

Friday 14 March 2008

Blog's First Birthday

A little late but that is how life goes sometimes. Thursday 13th March was the day when we were able to proudly say to each other - we have been blogging for one year. What a journey!

We have found ourselves looking eagerly at the comments left, pondering on the lives of those who visit, finding new blogs to visit from comments left and being constantly amazed at where the visitors to our blog come from.

To celebrate our 1st blog birthday - another giveaway! This time a little zipper pouch and another block of good old Cadbury's could be winging it's way to you. Leave a comment and be in the draw. Comments will close on Monday night.


The zipper pouches are the latest bit of crafting to be explored. I had previously made a pouch from the instructions in our Bend the Rules Sewing book and was a little disappointed with how the zipper looked in the corners. Much blog surfing later and I came across this tutorial. Instead of the zipper being at the top it is on the side - giving a very nice look to the whole pouch. Thanks so very much Sew Sally for posting this tutorial for all to share.

Another try from the Bend The Rules book was the simple tote pattern. I am not that sure with the end result - it is quite small. I love the fabric and have found that small it may be but it is the right size for my lunch box. So now I have super duper lunch box bag. Cats on the outside and umbrellas on the inside. I think that I may have made the box corners at the bottom of the bag a little bigger that the one that is pictured in the book. There are no specific measurements given. It would be an ideal size for a toddler's bag.


Thanks to everyone who left a comment. We will be posting soon to let you know who the lucky winner is.

Monday 10 March 2008

Congratulations

Well, a winner has been chosen for our 100th post giveaway. Congratulations Gina, enjoy your birthday book and chocolate! Thank you once again to everyone who commented, we always love to hear from people reading our blog :-)

Friday 7 March 2008

100th POST!

Wow how amazing that we've posted 100 posts already! So to celebrate this, we're doing a giveaway. So leave a comment and we'll send someone the birthday book that Crafty Things recently made, and a block of Cadbury's Chocolate. Comments will close Sunday night, Aussie time.

In other news, I've finished my third type of amigurumi, a ladybug.
From All Things Cr...

One very important thing I learnt: crocheting with black wool is a baad idea for a beginner! It was so hard to see my stitches. But anyway he's cute and currently sitting under a pot plant with his silver eyes shining out at us. They're from the same pattern Crafty Things used to make these. And oh look what else is in that post - a birthday book! However that is a different one to the giveaway but is the same idea.

So comment away all you lovely bloggers!

Ok, times up. Thanks everyone who posted comments, the winner will be revealed soon!

Tuesday 4 March 2008

Lots and Lots of Cross stitch

Since I haven't been doing much crafting lately, here's the result of my holiday cross-stitching. Sorry but this will be a picture heavy post.


From Blog Photos


This one took me a little while to stitch as it's one of the bigger ones I've ever stitched. I usually keep my stitching to quick little charts. I'm really glad I got this one, it was $10 at Spotlight and a very enjoyable stitch. I love the design, it's based on the Suzy's Zoo characters and who could resist it? Also I can proudly say this design is the one I learnt to do French knots properly and they actually worked. Before I would try and try and give up. I'd either sew on a bead or ask Crafty Things to give me a hand. So I'm very proud of this one.


From Blog Photos


This was a kit given to me for Christmas with excellent timing as I was looking to try a sampler. This being so small was easy and quick, a great first sampler for me to try.


From Blog Photos


Crafty Things has a large collection of kits from the front of magazines. I've slowly been working my way through them. This card was stitched incredibly quickly in front of the TV.


From Blog Photos

This is my current WIP only waiting for its back stitch. It's another card kit from the stash of magazine kits. I started it around Valentines day but then all cross stitch got put away for a while so it's only just being finished.


From Blog Photos

This one was completed a while ago but I was back at Spotlight, dangerous place that, and found two more in the set - Autumn and Spring. At $10 I bought them. A friend of mine mentioned that she has the Winter one so I'll photocopy her chart and then I can stitch the whole set and make a quilt perhaps.


From Blog Photos

There they are with 3 other kits now on my to-do list. Crafty Things and I went through her stash of kits she's bought and never started and I picked out these three to do myself. A half finished one almost found its way here too but the stitches were going the opposite side to me (Crafty Things is left handed and I'm right handed - it causes some problems) so it went back into the box. Anyway, top left is a gorgeous Snugglepot and Cuddlepie bookmark. Crafty Things is halfway through another of these but this one has much less back stitch which is what has slowed her down. Top right is a large 'Underwater' kit, much much bigger than anything I've ever stitched before. The design is so pretty though and it's about time I challenged myself with something bigger. Crafty Things got close to starting so all the threads are already sorted and the aida had been rolled up and tucked away so there's no nasty creases. With luck I'll get it finished in the next 2 years. Bottom middle is a cute little teddy bear (a recurring theme maybe??) with the text "days to remember". Two in the same series have been stitched for my brother and I and they look good all stitched up. It's fairly simple with blocks of solid colour unlike the 'Underwater' one.

Made it to the end? Well done.
With that lovely inspiration I think cross stitching will be my focus for a while =)

By the way, this is our 99th post. Next is the 100th post, wow I can't believe it!! How time flies!

Monday 3 March 2008

Latest Amigurumi

On the crochet front I, craftythings29 --- Ravelry name, found another very simple pattern to try. I found this while cruising the vast expanses of Ravelry (almost got lost forever... never to be seen again.) This pattern is for a very simple bird and can be found here.

So far four complete birds have made their appearance and a fifth is part way to completion.

Three little feathered friends and another was completed soon after. The one on the right is my first attempt at stripes when crocheting in the round. Good thing that this is a front view shot.

Just had to post this picture. I was playing around with my camera's flash settings. I really like the reflection. I am still experimenting with the settings on my DSLR.

Hopefully Avid Crafter will post soon - she has been hit with that dreaded affliction ----loss of crafting mojo.

Experimenting with a New Acquisition

Crafty Things gets to play...... For my birthday this year (way back in January - gosh we are already in March!!) I was lucky enough to get some gift vouchers to a lovely little scrapbooking shop. These vouchers enabled me to purchase a .......

BIND IT ALL machine.

Unfortunately for me they were out of the wires that you need to use with the machine. I have had to wait (patiently well maybe not that patiently - I only phoned them a few times to see if the wires had arrived) for the wires to come back into stock. Yippeeeeeee - last week I got a call to say the stock had arrived. Time to play.

I very quickly learnt that there is a little bit of a knack to this gadget. My first attempts didn't end up with beautiful round binding wires but slightly oval shaped, crooked wires. The next big mistake was to start with a wide project that meant I was learning two new things at once. The machine only binds six wires at one time and with a larger project you progressively move the wires along (lining them up oh so carefully.......well lining them up better as you go along!) and bind in sections. Not quite as easy as it looks in the instructions.

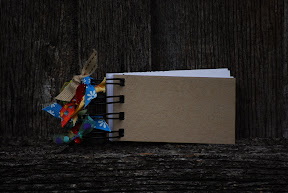
Here are my first few attempts. First up a little notebook of recycled paper - tizzied up with lots of ribbon to hide the shonky wire which had a mind of its own.


Next an ideas book - I have made these before and taken them off to be bound with plastic comb binding. The idea came from this blog and I made one for my daughter last year for her to keep track of all her crafting endeavours. I used envelopes for pages, coloured card, thick and thin paper but did not add many inside decorations. The blog I used for my inspiration had beautiful decorations on each page. I did add a few things - I scattered them throughout - to my daughter's book but the latest ones have only got an array of different types of papers for pages. I covered one of the fronts with fabric using fusible webbing and used a piece of double sided scrapbooking paper for the other with a protective plastic layer on top.

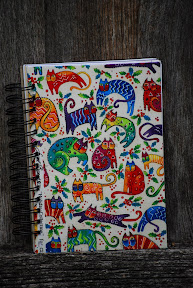
Ideas book with fabric cover.

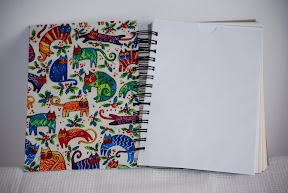
One of the envelope pages.

Plastic protective cover over scrapbooking paper.

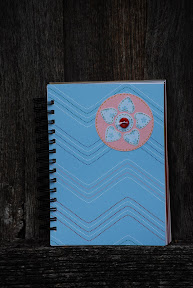
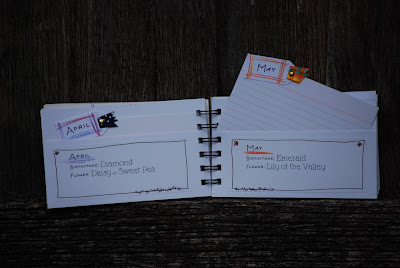
My latest experiment was to make another birthday book (Blogged about here). This time I was much more successful with the wire binding and was very happy with the end result. I used my Fiskar's tag punch to label the removable month pages and went with computer printed labels rather than hand lettered. The front cover was again protected with a bit of left over laminate and the back cover was part of a recycled pad backing. The inside pocket pages are cartridge paper and the inserts are index cards.


That is all the play I have had time for but I am thinking about a few other ideas.